Cart
0
$0.00

Whether you're dreaming of building a custom home, selecting a stock house plan online, or planning a renovation, the process of all three options often begins in the same place — looking at floor plans and photographs for inspiration and ideas.
Homeowners naturally gravitate toward designs that look appealing at first glance. With the abundance of presentation technology available today, many architects and professional designers have excelled at turning an old-fashioned, black and white, 2-dimensional floor plan or exterior elevation into a visual masterpiece. It's easy to focus on what looks good – and is an excellent source for inspiration and ideas. But the real challenge still exists - looking beyond an attractive rendering or marketing plan to ensure a deeper understanding of how those spaces will feel and function once the home is built and lived in.
Many homeowners feel overwhelmed when trying to interpret what the numbers and symbols on their house plans actually mean. If you are not familiar with what you are seeing, these symbols quickly become bold visual "noise" that distracts the homeowner from viewing the overall layout as a whole.
For this reason, drawings during early design stages purposely include very little information. The marketing plan that is stripped down of its technical information is a necessary step of translation. However, this same lack of technical information provided often invites many questions to be answered.
This can be particularly challenging when you are shopping for stock house plans online. The images shown on the website listing are almost always presentation level documents only. Not until you have purchased the plans, and already spent your money, do you then see that additional level of technical detail for the first time.
When finally receiving this technically detailed drawing set, you may find that certain elements might not be quite as you had imagined. But by that point you have already made the purchase and committed.
Working through the steps of a custom designed house plan can help reduce the incidence of surprise. The custom home design process does still typically start in the same manner - as a simple floor plan with minimal information listed - but what you do gain is the ability to speak first hand with the architect or professional designer to ask any questions that you have each step of the way.
That is not stated to create an impression that homeowners should not purchase stock house plans online. Stock plan sales date as far back as the late 1800's/early 1900's when mail-order catalogues began offering complete home kits. It is not a new service concept and there are many companies that do offer quality, screened, fully comprehensive drawings in a modifiable stock plan form. If a stock house plan just happens to be your perfect floor plan match there is typically an opportunity for cost savings available (in comparison to custom designed house plans).
It may not be mandatory to use custom home design services to find the plan that is best for yourself or your family. Using stock house plans just requires the homeowner to take on a more independent role of evaluating the success of the floor plans - since the direct line of communication for questions may not be as easily or frequently available as in a custom design process. Do not let that intimidate you from overseeing this process. This article is going to show you how you can use "The Paper Scale Method" to gain a better understand of ANY floor plan that you may be considering.
Note: If you do happen to be currently reviewing a drawing that has been taken to a further level of technical detail, and are struggling to interpret the additional numbers and symbols that you are now seeing, you can visit my previous article "how to read a floor plan like an architect or professional designer" for some helpful explanations.
Marketing and design drawings purposely include very minimal technical information. This is by design. To eliminate drawing "noise" and help the homeowner initially focus ONLY on the layout of the home. Some architects or professional designers may right away include a single front exterior elevation of the home, but it is very normal if your design professional starts by showing you nothing more than a single, 2-dimensional, floor plan view.
Depending on how your fee arrangement is set up with your architect or designer, this process is generally beneficial for you - as you will likely have a few rounds of revisions before developing your plans further. It takes much less time to revise a single floor plan than it does to revise a full set of drawings. So, if your revision fees accumulate at an hourly rate, this can provide a great cost savings to you by only adding additional detail after you have reached satisfaction in the current stage of design.
When browsing online stock house plans, you will typically get to see both the floor plans and exterior elevations from the start. But those too will generally have the notations and technical information stripped down to a cleaner, presentational level of detail.
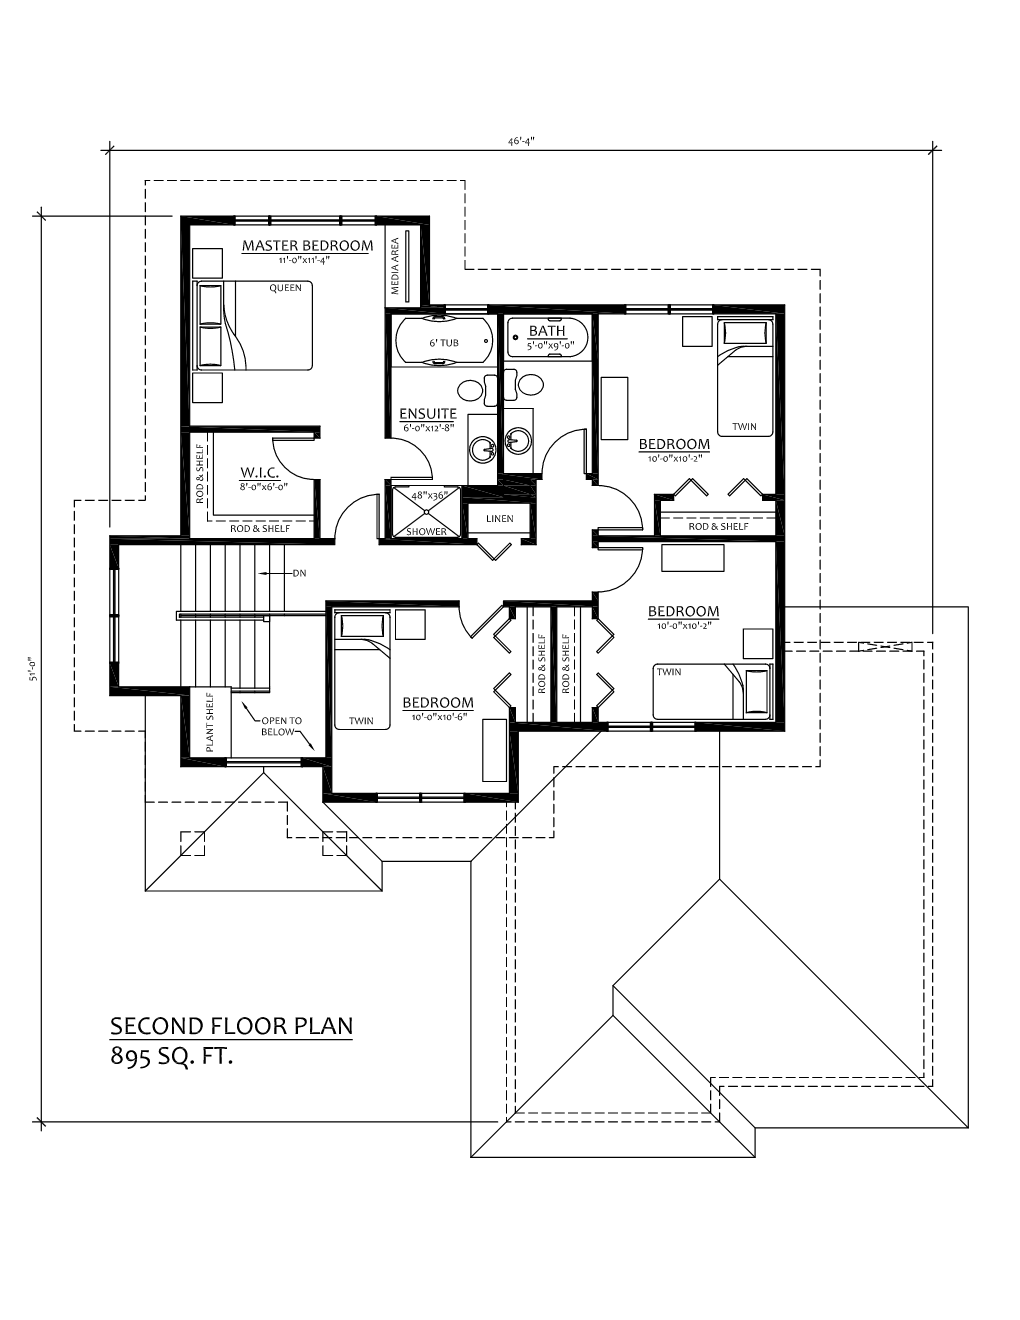
So, regardless of your project type, the first drawings that you will be exploring for inspirations, will likely appear in a similar form to the image shown below. You will see the overall layout of the home, indications of where cabinetry and plumbing fixtures occur, possibly some overall dimensions of the house, and ideally the name and size for each room found within.
While this is the accepted standard for marketing or presentation floor plans, what often happens, especially as the home size increases - is that more and more notations get removed to ensure that the layout remains clear to read when scaled down to a small display size (visualize your mobile phone screen displaying a 3,000 sq ft footprint). You may find that many floor plans include the names and overall dimensions of the primary rooms (Living Room, Kitchen, Dining, Master Suite), but that the smaller rooms (maybe laundry, closets, or pantries as examples) only list the room name, not the overall dimensions of the space. For these spaces, even the room name may be in abbreviated form.
This is where questions can end up going unanswered for many homeowners. The stock plan LOOKS good to the homeowner, maybe they also conducted the flow exercise from my past article "What Makes A Floor Plan "Good" and have determined that the plan FEELS good as well. But is that walk-in-closet 6' wide or 8' wide? It may not be labelled.
As a plan gets larger and is scaled down to display well online or in a magazine, it can become very difficult to discern between a closet that is 6' in width or a closet that is 8' in width. Yet that 2 feet of difference in a room such as a walk-in-closet, makes a great difference between a space that feels crowded, or a space that feels comfortable.
The good news is that EVERY homeowner can answer many of these questions themself and for ANY floor plan. And the simplest way to do so is by utilizing "The Paper Scale Method".
Before I begin, I will also note that there are other methods available to carry out the below process using your computer. Adobe Acrobat and BlueBeam Revu are two programs (of I am sure many) that you can open a pdf copy of a floor plan that you are interested in, set the scale of the drawing, and then proceed to measure any other distances within the plan that you are wanting to clarify.
Autodesk AutoCAD is another software program that requires technical knowledge to operate, but is an immensely valuable tool as most architects and professional designers work with it in one way or another. In AutoCAD you can again upload a .pdf or .jpg of the floor plan that you are interested in, scale it to size, and then use the "Distance" command to check the dimensions of any areas that you have questions about. If you are comfortable with using the software you can also go the step further of exploring any changes you might like to consider before extending them on to you architect or professional designer.
The catch of these three programs is that they all require at least basic technical knowledge to operate, and often include subscription service fees beyond the initial trial timeframes. So, while it may not be flashy, "The Paper Scale Method" is a tried-and-true option that ANYONE can use to gain a better understanding of ANY floor plan.
Whether you intend to purchase a stock house plan or just view them for inspirational ideas, browsing magazine or online stock plans is the first step that most homeowners take in their initial planning stages.
There is no shortage of stock plans available. A simple Google search for "Stock House Plans" quickly presents many of the most popular stock plan websites to date:
https://dongardner.com/collections/house-plans
https://www.architecturaldesigns.com/
https://www.thehousedesigners.com/
When you have found a plan (or plans) that you like, simply save the image files of the floor plan view and print them on standard letter size (8.5" x 11") paper. If you are considering a few different floor plans, be sure to notate the website and plan number for each so that you can easily refer back to your favourites later!
When you print your floor plan, adjust the print settings as needed so that it fills the letter size paper the best that you can. It does not need to be printed to any set scale to use the paper scale method, it just is easier to work with the larger you are able to make it. A simple "Fit to page" or similar print setting that auto-scales the image to best fill your paper size is all that you need to do.
Using a separate piece of paper, or even just tearing off an unprinted margin from your printed floor plan, the next step is to begin to create your paper scale.
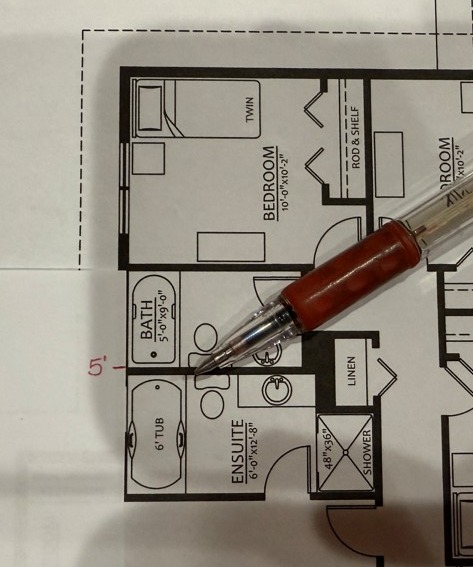
Typically, the best way to start this is to locate a standard bathroom on the floor plan. While there IS variety available, the majority of standard tub/shower units are 5 feet long. So, by locating an ordinary bathroom that includes a standard tub/shower unit, you can make a safe assumption that this distance is very likely to be 5'.
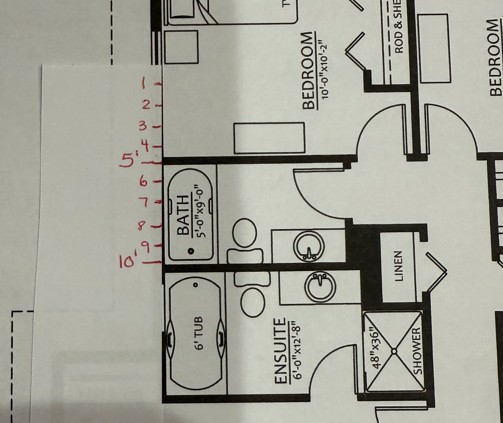
Placing your separate piece of paper, or torn off margin, beside the long edge of the bathtub, align the corner of the paper scale with one edge of the bathtub. This becomes your 0' marker. Now place a pen tick at the opposite end of the bathtub. This becomes your 5' marker.
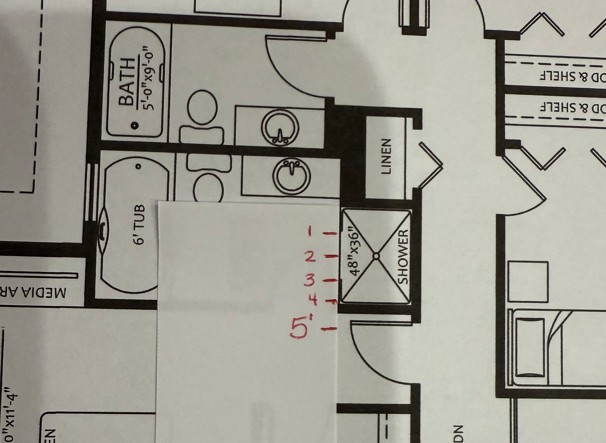
Once you have placed the 5' marker on your paper scale, you can further divide the space between the corner of the paper and this 5' mark, into 5 equal spaces by placing 4 more tick marks. Your paper scale can now measure 1', 2', 3', 4' and 5' increments.
Before committing to this paper scale fully, I next perform 2 checks:
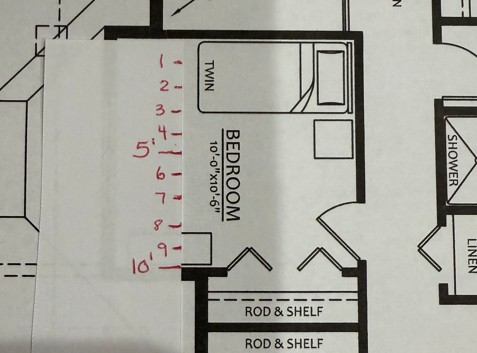
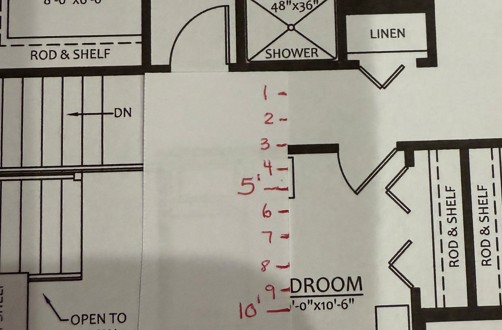
Scale the size of the front door on your floor plan. While there may be some variety amongst plans (ie: double doors, 42" extra wide doors, or older plans may still have a 32" width door), the majority of standard front entry doors will be 3 feet wide. So, if you lay your paper scale on the width of the front door and it matches your 3' foot marker, that is a promising sign that your paper scale is on the right track.
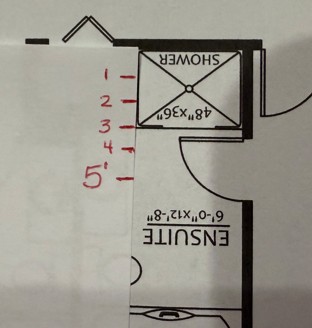
Since I happen to be using a second floor plan in this example, I do not have a front door to use as my check. Instead, this plan happens to label a 3' x 4' shower in the Ensuite. Laying my paper scale in both directions, I have confirmation that my scale is accurate.
Since my shower size check aligns, I next add 5 more feet to my paper scale. Returning to the same standard bathroom (this is very important as you can see the bathroom immediately adjacent labels a 6' tub), repeat the same process as above. This time, place your 5' marker at one end of the bathtub, and create a new mark at the other end of the bathtub. This is now your 10' marker since you have marked the length of the 5' bathtub twice. Again, divide this new section into five equal spaces, numbering those marks at 6', 7', 8' and 9'. You now have a paper scale from 0-10'.
Step 4: Finish Your Paper Scale
Continue returning to the same bathtub symbol, adding 5' increments to your paper scale, until you have reached a number large enough to measure anything you wish to know about your floor plans. I usually continue to a number that matches the largest spaces of the floor plan. 20' to 30' will generally suffice for measuring a kitchen and dining space adjacent to one another, or a garage that maybe has some jogs in the footprint and you want to know the actual sizes of each bay.
Alternatively, you can stop your scale at this 10' marker position and just mark increments of 10' as you move across any larger spaces. You will find your preferred method with a little practice.
Use your paper scale to decipher information that is not otherwise specified on the floor plan you are reviewing. Some suggestions of where to use your paper scale are as follows:
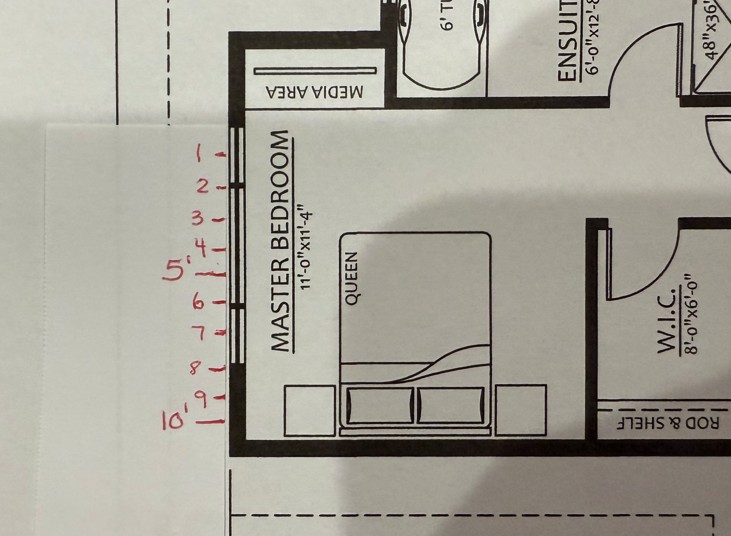
Example: A bedroom may be labelled as 12' x 16' – which sounds spacious for the sleeping area. But if this room is not a simple rectangular shape, these numbers may actually be an overall extent range of dimensions. The room may actually consist of a 12'x10' sleeping space plus a small 6'x6' sitting nook extension. With the plan simply labelled as 12' x 16' for that room, an assumption might be made that the sleeping area of the room is 12'x16' on its own, NOT inclusive of the small sitting nook space. A misinterpretation like this can obviously create significant issues for furniture selections and placement. It is very common for atypically shaped rooms to be summarized as an overall extent to keep a plan reading clean at early design or presentation stages. The paper scale method comes in handy to provide clarity and measurement of actual dimensions anywhere that rooms aren't a standard obvious shape.
The paper scale method is an ideal tool for adding furniture to your floor plans when a suggested furniture layout has not been provided.
Alternatively, when a suggested furniture layout HAS been provided, the paper scale method can also serve as a good check to see what size of furnishings have been shown. Does what is shown reflect similar size to any existing furniture pieces you will be keeping in your new build or renovation project? Have they shown realistic sizes of furniture or just made it look "good" for marketing purposes?
For larger windows you can assess the overall makeup of a multiple unit configuration. Maybe a triple configuration window is made up of a 4' middle segment with a 2' segment on each side.
Note: If an exterior elevation is available for the plans that you are considering, you can further evaluate the overall window sizing – again using this paper scale method. Your paper scale setup will be much the same as it was for your floor plan except instead of starting with the 5' standard bathtub, you might start creating your marks based off of a standard 3' door width.
This time you might check the accuracy of your paper scale against a measurement that you have already checked in plan view. Does a certain window measure as 3 feet wide on both the plan view paper scale as well as your exterior elevation paper scale? If so, that is likely confirmation of a correctly executed paper scale setup.
Creating a paper scale for a floor plan that you are considering is easy – and places a whole new level of knowledge and understanding for that floor plan into your own hands. You don't need to reach out to every seller with an extensive question list about room dimensions. You can now check those yourself.
You can now measure for yourself the approximate footage of rod and shelf each closet will hold, or how many feet of countertop surface you will have in your new kitchen.
The paper scale method enables you to answer many smaller (but very important) questions yourself and provides you the opportunity to flag any areas of concern at the earliest stages of the process.
For example recognizing: "I DO love this plan, and would like to move forward with it, but I KNOW immediately that I will need to extend 2 more feet throughout this bedroom to fit my existing furnishings comfortably."
The ability to answer these questions yourself removes tremendous correspondence time off the clock of your invoice. The ability to analyze your floor plans early and recognize that you WILL need to make a revision, can save you major expenses in future by understanding and addressing this revision long before the construction stage has begun.
Anyone can translate their favourite floor plans into a much deeper level of understanding. Give the paper scale method a try on the stock house plans that you are currently considering or floor plans you are developing custom.
If you still have some uncertainties, or just value a professional second opinion, feel free to browse our floor plan review options to order an independent, unbiased design review of the floor plans that you are considering.

Today's smart kitchen devices are about much more than technology—they're designed to simplify everyday routines, save time, and make cooking more enjoyable. Whether you're preparing family meals, entertaining guests, or simply trying to make busy weekdays run more smoothly, the right smart kitchen device can quickly become one of the most...

Smart lighting can make everyday living more convenient by allowing homeowners to control lights remotely, create schedules, adjust brightness levels, and automate routines throughout the home. In this guide, we'll explore some of the most popular smart lighting systems available today and highlight options that can help improve comfort,...

Smart home assistants can help simplify daily routines by allowing homeowners to control lighting, security devices, thermostats, entertainment systems, and other connected products from a single platform. Here are our top smart home assistant recommendations for homeowners.